Configuration reference
Since v0.13.0, the Pi Agent add-on’s Configuration page has contained just 4 options. This appendix explains what each option does, its default and valid values, when to change it, and when to leave it alone. You will rarely need this page—but when you do, it is your quick reference.
When to use this reference
Under normal circumstances, you do not need to open Pi Agent’s add-on Configuration page. Once you have installed Pi Agent (Chapter 2) and entered your API key (Chapter 6), you can simply launch it from the sidebar. You may go a year without touching Configuration.
You will need to open it in a few specific situations:
- Troubleshooting with logs: Set
log_leveltodebugwhen you need more detailed diagnostic information. - Incorrect timestamps: If log timestamps are 8 hours behind your local time, set
timezonetoAsia/Taipei, or use the appropriate IANA identifier for your location. - A broken video pipeline: Reinstall video-tools if the Chromium or virtual environment is corrupted. Chapter 18 explains why this may be necessary.
- The environment-variable escape hatch: Use
env_varsif your network requires a corporate proxy or you need to change the Chromium download mirror.
Each of the four options corresponds to one of these situations. Every section follows the same format: purpose / default / valid values / when to change it / pitfalls / example.
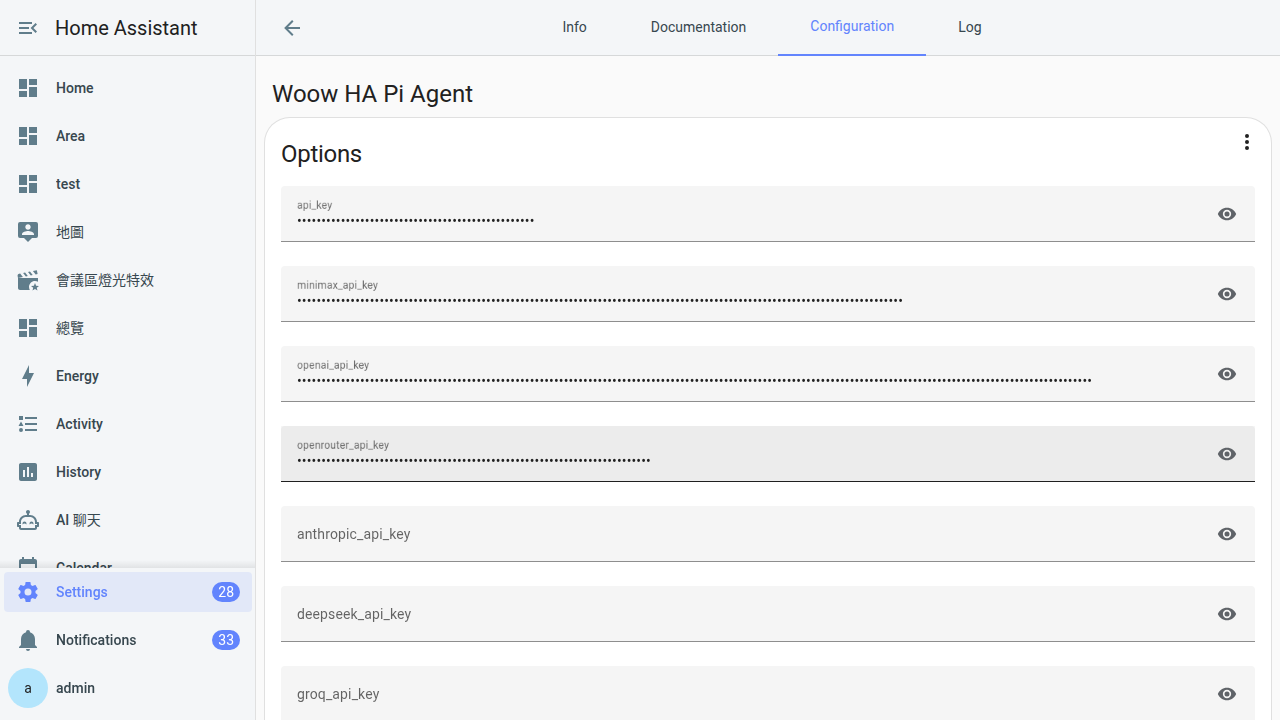
The key point: API keys are not configured here
This is the easiest detail to miss after upgrading to v0.13.0. The add-on Configuration page has no API key fields. Keys for every provider—including OpenRouter, OpenAI, Anthropic, DeepSeek, Groq, MiniMax, and GLM—are managed in pi-web’s built-in Models panel. Chapter 6 explains the process, and Chapter 21 documents the version change.
The four options in this appendix are add-on container-level settings. They control how the add-on runs, how detailed its logs are, which time zone it uses, and whether to reinstall its video tools. They are entirely separate from choosing an AI provider or API key.
| What you want to change | Where to change it |
|---|---|
| Add an AI provider, replace an API key, or change a base URL | pi-web → Models panel (Chapter 6) |
| Install or remove a Skill | pi-web → Skills panel (Chapter 14) |
| Change add-on log detail, time zone, video-tools installation, or environment variables | The add-on Configuration page covered in this appendix |
Option 1: log_level—Log detail
| Item | Details |
|---|---|
| Purpose | Controls how much detail the add-on prints on the Logs page. It also controls the verbosity of pi-web’s back-end logs. |
| Valid values | error, warn, info, debug (from least to most detail) |
| Default | info |
| Restart required | Yes. After you save the change, the add-on restarts automatically and applies it. |
When to change it
- Everyday use: Keep
info. It includes the information you normally need without producing excessive noise. - Troubleshooting: Select
debug. It records every HTTP request, Skill scan, and provider call. Remember to change it back when you finish troubleshooting. - Warnings only: Select
warnto record warnings and errors. This can suit routine monitoring once the system is stable. - Errors only: Select
errorto record nothing but errors. This is not recommended for long-term use, because warnings often provide advance notice of a problem.
debug enabled can produce thousands of log lines per minute. Home Assistant rotates its logs when they exceed the size limit, but files inspected directly over SSH may still consume hundreds of MB of disk space. Change the level back to info when you finish troubleshooting.Example
log_level: debugUse this while investigating why a video pipeline failed. It exposes each Playwright startup step and every ffmpeg argument. When you have found the problem, change it back:
log_level: infoOption 2: timezone—Time zone
| Item | Details |
|---|---|
| Purpose | Affects three things: (1) timestamps in add-on logs, (2) dates used in Session file names and backups, and (3) SRT subtitle cue timing in video-pipeline output. |
| Valid values | IANA time zone identifiers, such as Asia/Taipei, Asia/Tokyo, America/New_York, or Europe/London. |
| Default | Empty (equivalent to UTC) |
| Restart required | Yes. After you save the change, the add-on restarts automatically. |
Why you should set your local time zone
If you leave this setting empty, the Logs page uses UTC. In Taiwan, for example, those timestamps are 8 hours behind local time. An action performed at 8 p.m. therefore appears in the logs at noon, which can make the corresponding entry difficult to find. Setting Asia/Taipei aligns the timestamps with local time; use the correct IANA identifier for your own location.
The setting also affects dates in Session file names. In Taiwan, a Session opened around 11 p.m. can otherwise receive a file name dated earlier that day in UTC, making records harder to reconcile.
Taipei instead of Asia/Taipei silently falls back to UTC. The same applies to unsupported forms such as +08:00, CST, and GMT+8. Use the standard Region/City form.Common IANA identifiers
| Location | IANA identifier |
|---|---|
| Taiwan | Asia/Taipei |
| Japan | Asia/Tokyo |
| Hong Kong | Asia/Hong_Kong |
| Singapore | Asia/Singapore |
| Eastern United States | America/New_York |
| Western United States | America/Los_Angeles |
| United Kingdom | Europe/London |
Example
timezone: Asia/TaipeiOption 3: reset_video_tools—Reinstall video tools
| Item | Details |
|---|---|
| Purpose | On the next add-on start, deletes /data/pi-agent/venv/, /data/pi-agent/playwright-cache/, and the .video-tools-installed sentinel file, then reinstalls everything from scratch. This forces video-tools-init to repeat the complete download (Chromium + Python virtual environment, approximately 720 MB). |
| Valid values | true / false |
| Default | false |
| Restart required | Yes. After you save, Home Assistant Supervisor automatically restarts the add-on and triggers the reinstall—you do not need to restart it manually. When the reinstall finishes, the flag automatically returns to false through the Supervisor API, preventing another reinstall at every startup. |
When to enable it
- The video pipeline repeatedly fails, but the logs do not reveal the root cause. Chapter 18 explains what video-tools does.
- The installed Chromium version is too old to capture screenshots of certain websites.
- Python packages in the virtual environment no longer match the main add-on application, which can occasionally happen after an upgrade.
- As an annual “spring cleaning”: even if nothing is wrong, you can run it during off-peak hours to refresh Chromium.
video-tools-init s6-oneshot service reads the true flag, deletes the sentinel file and the virtual-environment and Playwright-cache directories, and reinstalls them. After a successful run, pi-web uses the Supervisor API to return the option to false automatically, so you do not enter a loop that downloads 720 MB after every restart.video-tools-init start in parallel. Chat remains available even if the download fails.Example (one-time use)
reset_video_tools: trueSave → wait for Supervisor to restart the add-on automatically → watch the Logs page for video-tools-init to begin downloading → when it finishes, reload the Configuration page and confirm that the value has returned to false. No further action is needed.
Option 4: env_vars—Environment-variable escape hatch
| Item | Details |
|---|---|
| Purpose | Passes arbitrary environment variables to the main pi-web application. This is an escape hatch for edge cases in which the add-on has no dedicated setting but an underlying tool recognizes a particular environment variable. |
| Format | A YAML list in which each item is {name: X, value: Y}. |
| Name rules | Names must match ^[A-Za-z_][A-Za-z0-9_]*$: ASCII letters, numbers, and underscores are accepted, but a name cannot begin with a number. Invalid names include a hyphenated name such as MY-VAR or a name containing Chinese characters. The initialization script skips invalid names and prints a warning on the Logs page. An invalid entry does not break the add-on, but that environment variable does not take effect. |
| Default | [] (an empty list) |
| Restart required | Yes. After you save the change, the add-on restarts automatically. |
Common uses
| Variable | Purpose | Typical use case |
|---|---|---|
HTTP_PROXY / HTTPS_PROXY | Routes pi-web’s outbound traffic through an HTTP proxy | A corporate network requires a proxy for internet access |
NO_PROXY | Excludes specified hosts from the proxy | The internal Home Assistant API must remain on the local network |
PLAYWRIGHT_DOWNLOAD_HOST | Sets the mirror used to download Chromium | A direct connection to the Playwright CDN is too slow, so a regional mirror is preferable |
OPENAI_BASE_URL | Overrides the OpenAI SDK’s default endpoint | The official OpenAI provider, with no custom base URL, must use an internal gateway or reverse proxy |
OPENAI_API_KEY or ANTHROPIC_API_KEY are not read by pi-web. The interface may accept the variables, but the keys will have no effect. Manage all provider keys in the pi-web Models panel; that is the only correct location.OPENAI_BASE_URL as a way to change every provider at once. It affects only the OpenAI SDK’s default when no custom base URL is set. OpenRouter, DeepSeek, Groq, MiniMax, and GLM each have their own baseUrl in pi-web’s Models panel. Those provider-specific values take precedence and are not overridden by this environment variable. Only the official OpenAI provider with an unchanged base URL is affected. To change one provider’s endpoint, edit that provider’s base URL in the Models panel instead of working around it with an environment variable.Example
Route traffic through a corporate proxy:
env_vars:
  - name: HTTP_PROXY
    value: http://192.168.1.1:8080
  - name: HTTPS_PROXY
    value: http://192.168.1.1:8080
  - name: NO_PROXY
    value: 127.0.0.1,localhost,homeassistant.local
Leave the list empty when it is not needed:
env_vars: []Complete configuration example
A typical configuration for a household in Taiwan looks like this. If you are elsewhere, replace Asia/Taipei with the IANA identifier for your location:
log_level: info
timezone: Asia/Taipei
reset_video_tools: false
env_vars: []
If you are investigating a bug and also need to use a corporate proxy:
log_level: debug
timezone: Asia/Taipei
reset_video_tools: false
env_vars:
  - name: HTTP_PROXY
    value: http://192.168.1.1:8080
  - name: HTTPS_PROXY
value: http://192.168.1.1:8080Options removed in v0.13.0 (historical reference)
If you upgraded from an older release, you may notice that many fields have disappeared from the Configuration page. Nothing is broken—they have moved. See Chapter 21 for detailed upgrade notes, or use this table as a quick reference:
| Former v0.12.x field | Where to configure it in v0.13.0 and later |
|---|---|
api_key (primary GLM key) | pi-web Models panel → GLM (zai) provider → API Key |
openai_api_key | pi-web Models panel → OpenAI provider → API Key |
anthropic_api_key | pi-web Models panel → Anthropic provider → API Key |
deepseek_api_key | pi-web Models panel → DeepSeek provider → API Key |
groq_api_key | pi-web Models panel → Groq provider → API Key |
openrouter_api_key | pi-web Models panel → OpenRouter provider → API Key |
minimax_api_key | pi-web Models panel → MiniMax provider → API Key |
extra_allowed_hosts (removed in v0.10.0) | No configuration is required. nginx now rewrites the header to Host: localhost, which passes pi-web’s host validation. |
Common pitfalls
-
Nothing happens after I change a setting
After editing the Configuration page, select Save at the bottom. In some Home Assistant versions, a floating element can obscure the button; scroll down slightly to reveal it. The add-on restarts and applies your changes only after you save them.
-
Options return to their defaults after the add-on restarts
This usually indicates invalid YAML—for example, incorrect quoting around
timezoneor incorrect indentation underenv_vars. Open the Logs page and scroll up to find a message containingparse errororinvalid config. It should identify the invalid field. Correct the field and save again. -
pi-web does not detect an entry in env_vars
There are three likely causes: (1) the name contains an invalid character, such as a hyphen, begins with a number, or contains Chinese characters; (2) pi-web does not recognize that environment variable—not every
OPENAI_*orANTHROPIC_*variable is supported, and pi-web reads only specific proxy and Playwright variables plus a small number of SDK base URLs; or (3) the entry is an API key, which never takes effect here. Enter API keys in the Models panel instead. -
reset_video_tools is enabled, but video-tools is not downloaded again
The normal sequence is select
true→ save → Supervisor restarts the add-on automatically →video-tools-initreads the flag → the download begins. If nothing happens after you save, confirm that: (1) you actually selected Save on the Configuration page—scroll down if a floating element obscures it; (2) the Logs page contains entries fromvideo-tools-init—if you see only “exit <100ms,” the flag was not read; and (3) if it still does not trigger, select Restart manually on the add-on page. After a successful download, reload the Configuration page and confirm that the option has returned tofalse. -
timezone is set to
Taipei, but timestamps still use UTCUse the complete IANA identifier:
Asia/Taipei, notTaipei,CST, or+08:00. An invalid value silently falls back to UTC, so it can appear to have been accepted. Enter the correct value, save it, wait for the add-on to restart, and then check the timestamps on the Logs page. -
Debug logs are consuming too much disk space
Change
log_levelback toinfoorwarn. Home Assistant OS normally rotates log files automatically, but on a Supervised or Container installation you may need to remove old files from/var/logyourself. Do not leavedebugenabled indefinitely; use it only while troubleshooting.
Frequently asked questions
How can I back up the add-on configuration for later restoration?
Where can I see the complete configuration currently in effect?
/data/options.json inside the add-on container. The latter is the final JSON configuration that Supervisor mounts into the add-on. It is useful for confirming that the YAML entered in the UI was parsed as intended.Does timezone affect AI responses—for example, the answer to “What time is it?”
timezone option. This option affects only log timestamps, dates in Session file names, and video subtitle cue timing. To change the Home Assistant host’s time zone, go to Settings → System → General in Home Assistant. The two settings are separate.How can I restore the default Configuration values?
log_level: info, an empty timezone, reset_video_tools: false, and env_vars: []. API keys are stored in pi-web and are not affected, so this action will not delete them. Remember to save afterward.Can I use env_vars to set TZ and override the time zone?
TZ=Asia/Taipei, and some underlying tools, such as Python’s datetime, will read it. However, using the dedicated timezone option is strongly recommended. It is the add-on’s official interface and configures the system, log, and application-layer time zones together. Using env_vars to set TZ affects only some contexts and can leave three parts of the system using different time zones, making troubleshooting more difficult.Can the 4 options be changed while the add-on is running, or is a restart required?
log_level, timezone, and env_vars at launch; the reset_video_tools value is read at startup by the video-tools-init s6-oneshot service from /data/options.json. Both steps are automatic.