Install a Skill from GitHub
Chapter 14 explained what a Skill is; now it is time to install one. You will open the Skills panel, search the skills.sh catalog for an existing Skill, select Install, and verify that it appears in the system prompt. You will not need to write code or connect to the Home Assistant host over SSH. The panel is a search-first storefront with package-spec entry as a secondary option—not merely a URL field. This distinction is easy for first-time users to miss.
Why start by installing someone else’s Skill?
Chapter 14 described a Skill as a way to teach an AI a specialized craft, and noted that many people publish ready-made Skills on GitHub. That chapter covered the concept; this one shows you how to install them.
Starting with an existing Skill has three advantages:
- No programming is required. A Skill is a folder containing a
SKILL.mdinstruction file. The author has already packaged it, so you only need to provide its source and select Install. - Try it before deciding whether it is worth your time. Instead of spending an hour studying examples, install a ready-made Skill in three minutes and use it for an afternoon. You can then decide whether to invest the time to write your own, as covered in Chapter 16.
- Learn from a good working example. An installed Skill is a live example of how someone else writes SKILL.md. When you are ready to create one, open
/data/pi-agent/skills/and study the structure and tone of itsSKILL.md; that is much faster than starting from a blank template.
There is another easily overlooked reason: Skills are central to the Pi Agent ecosystem, not optional decoration. Even with the same model—for example, GLM-4.6—using the right Skill can substantially change the result. With home-assistant-best-practices installed, the AI may tell you that a helper is preferable to a template sensor in a particular automation. Without it, the AI falls back on its own, possibly outdated, habits. This is not about which AI is smarter; it is about whether you have given it the rules for your home.
Four valid Skill package-spec formats
Pi Agent is built on @earendil-works/pi-coding-agent, whose command-line interface is pi. The Skills panel’s Add Skill button is a graphical front end for pi install <package-spec>. A package specification has a defined syntax; you cannot paste an arbitrary repository name. The official packages documentation lists these four valid source types:
| Source type | Example | Underlying action | Installation location |
|---|---|---|---|
| npm package | npm:@scope/[email protected]npm:my-pi-skill |
Runs npm install |
~/.pi/agent/npm/ |
Git (git: prefix) |
git:github.com/user/repo@v1git:[email protected]:user/repo |
git clone, with shorthand support |
~/.pi/agent/git/<host>/<path> |
| Git (full protocol URL) | https://github.com/user/repossh://[email protected]/user/repo |
git clone |
Same as above |
| Local path | /absolute/path./relative/path |
Records the path in settings and reads it in place | The source remains at its original path |
owner/repo value may look familiar from gh repo clone, but Pi Agent rejects it. GitHub shorthand must include the git: prefix: git:github.com/owner/repo. Without that prefix, only URLs beginning with https://, http://, ssh://, or git:// are accepted.All four forms ultimately use the same discovery mechanism. After resolving the resource, pi scans ~/.pi/agent/skills/, ~/.pi/agent/npm/, and ~/.pi/agent/git/ for Skill directories—folders containing SKILL.md—and registers the results as the set of Skills available when a session starts. The Woow add-on also symlinks $HOME/.pi/agent/skills to /data/pi-agent/skills, so the UI and CLI share the same state on the Home Assistant volume. This is the “Skills path bridge” described in docs/ARCHITECTURE.md.
~/.pi/agent/skills/ directory does not contain installed npm or Git packages. It is intended for folders containing SKILL.md that you create or place there manually, as explained in Chapter 16. npm and Git packages go under npm/ and git/, respectively; do not look for them under skills/.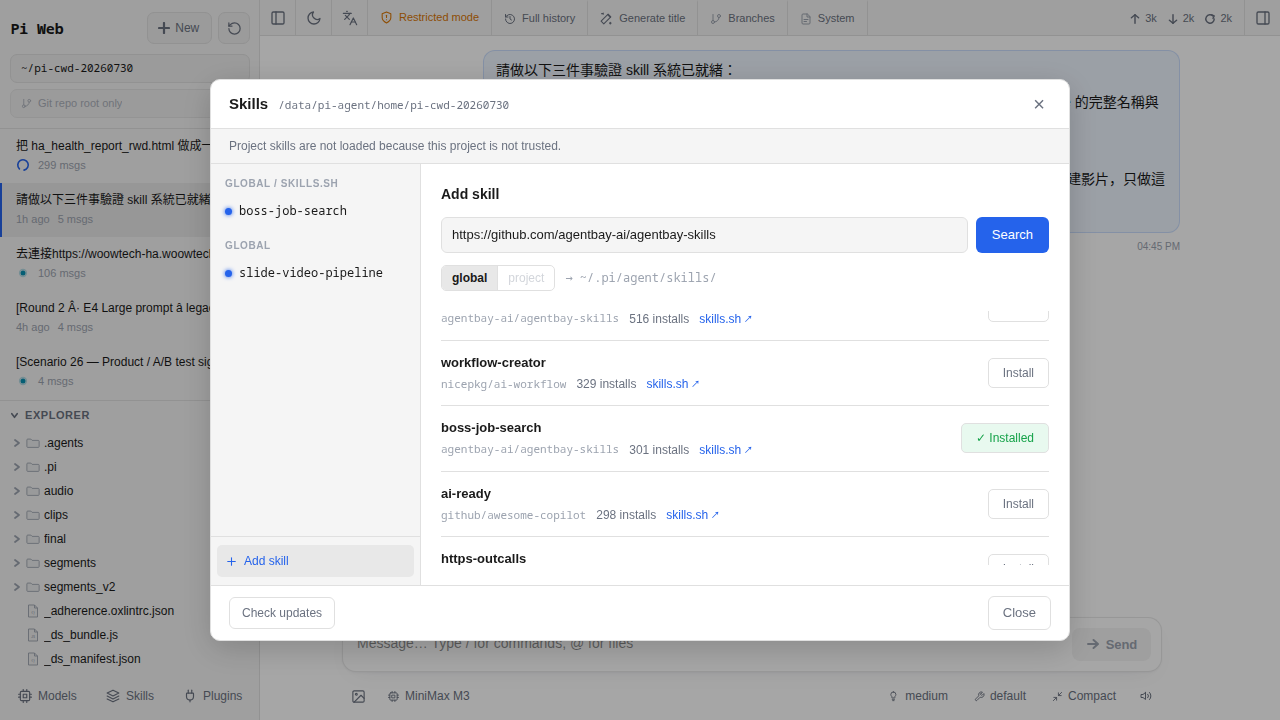
react or testing to search the skills.sh catalog. Add Skill opens a dialog where you can enter an npm: or git: package specification. Installed Skills appear below, with controls to enable or disable them, check for updates, or remove them.How Pi Agent downloads Skills
Understanding what happens behind the scenes makes the process less mysterious and troubleshooting easier. Pi Agent uses familiar package tools: an npm: source runs npm install, while a git: source runs git clone.
The Woow add-on base image has included git, openssh-client, curl, jq, and ca-certificates in the Containerfile’s initial apt-get install block since the first release. The comment explicitly notes that these packages “are needed by the provider check, the models.json merge and the skills CLI, which shells out to git and ssh.” Selecting Install therefore runs an operation appropriate to the specification:
# You paste npm:@foo/bar
pi install npm:@foo/bar
# Under the hood: npm install; files are stored under ~/.pi/agent/npm/@foo/bar/

# You paste git:github.com/user/repo@v1
pi install git:github.com/user/repo@v1
# Under the hood: git clone --branch v1; files are stored under ~/.pi/agent/git/github.com/user/repo/

# You paste https://github.com/user/repo
pi install https://github.com/user/repo
# Under the hood: git clone; files are stored under ~/.pi/agent/git/github.com/user/repo/
In the Woow add-on, $HOME/.pi/agent/skills is a symlink to /data/pi-agent/skills. This Skills path bridge is described on line 148 of ARCHITECTURE.md: “Pinning HOME into the volume is what makes the CLI and the web UI agree on state.” The UI and CLI therefore see the same installed Skills; a package installed through the CLI does not disappear from the UI. The UI is simply a graphical front end for pi install, which explains several behaviors:
- Why are there separate
npm:andgit:prefixes? They identify different package-management systems and tell Pi which installer to use. - Why can a private repository work over SSH?
openssh-clientis installed, and the client reads~/.ssh/configand uses your key. Private HTTPS repositories are more difficult because the UI has no field for a personal access token; that is a UI limitation, not a backend limitation. - Why are installed packages not updated automatically? Git references such as tags and commits are pinned. Use
pi update --extensionsor Check Updates in the UI to look for a newer version. A reference such as@v1is deliberately held in place. - Why might a failed installation leave a broken directory? Version 0.83.0 fixed this bug: “Fixed failed Git package installs leaving partial directories that blocked clean retries.” On an older version, remove that directory manually with
rm -rfbefore retrying.
/data/pi-agent/ volume, as explained in Chapter 20. Your Skill collection—including skills/, npm/, git/, and the enablement state stored in ~/.pi/agent/settings.json—returns when you restore the host, so you do not need to reinstall everything.Install a real Skill
This walkthrough uses a well-known public repository: mattpocock/skills. Matt Pocock is a prominent TypeScript educator, and this repository is his public collection of Skills. It is not directly related to home use, but it provides a reliable baseline for learning the installation process.
-
Open the Pi Agent workspace
Select Pi Agent in the Home Assistant sidebar to open the main interface, following the route introduced in Chapter 3. The session list is on the left, the conversation area is in the center, and a row of small icons appears at the upper right. That row is the panel switcher.
-
Switch to the Skills panel
The top toolbar includes resource tabs for Extensions, Skills, Prompts, Themes, and Plugins. Select Skills; its tooltip reads Skills, and its internationalization key is
i18n.skills. The Skills management panel opens. At the top is a search field whose placeholder reads “e.g. react, testing, deploy” (i18n.skillSearchPlaceholder), with an Add Skill button at the upper right. Installed Skills appear below. On a first visit, the empty list reads “No skills found” and links toskills.sh“to discover and install skills for your agent.” -
Use either route: search first, then use Add Skill if necessary
Route A (recommended): Enter
mattpocockor another keyword in the search field. Pi Web calls/api/skills/searchto search theskills.shcatalog. Matching cards include an Install button. Route B: Select Add Skill to open a dialog with a field whose placeholder isnpm:@scope/package. You may enter any valid package specification listed in the previous section. -
Enter a valid package specification
If you use Route B, enter any one of these:
git:github.com/mattpocock/skills
# or the full protocol URL
https://github.com/mattpocock/skills
# or specify a tag / commit
git:github.com/mattpocock/skills@main
Do not enter bare
mattpocock/skills; Pi rejects that shorthand. GitHub shorthand requires thegit:prefix. The dialog also offers a scope switch: global corresponds to~/.pi/agent/settings.json, while project corresponds to.pi/settings.json. Choose global unless you specifically need project scope. -
Select Install to begin downloading
Select Install (
i18n.install); the button reads “Installing…” while the download is in progress. The operation runspi install, and the backend sends a POST request to/api/skills/installwithbody: {cwd, package, scope}. Depending on the repository size and your network, this usually takes 5–30 seconds. Do not cancel or refresh the page. When it finishes, the “Package installed.” toast appears (i18n.packageInstalled). -
Confirm that the Skill appears in the list
After installation, a new entry appears in the panel. Each row has an enable/disable switch, Check Updates, and Remove. The physical installation path depends on the source: npm packages are under
~/.pi/agent/npm/…, while Git packages are under~/.pi/agent/git/<host>/<path>/…. The UI’s Installed Path field (i18n.installedPath) shows the exact location. -
Reload or start a new session, then verify the system prompt
The Skills panel usually has a Reload Session button at the upper right (
i18n.reloadSession). It reruns Skill discovery and displays “Session reloaded.” Alternatively, select New Session at the upper left. The system prompt is assembled when a session starts and is not reread midway through a session. Next, open the read-only System Prompt panel at the upper right and scroll down. You should find an<available_skills>…mattpocock-skills…</available_skills>block, following the Agent Skills specification. If your newly installed Skill appears there, Pi recognizes it and the AI knows it is available in this session.
enableSkillCommands is enabled, Skills are also registered as /skill:name slash commands. Type /skill: in the conversation field to list the available Skills. See “Skill Commands” in skills.md.Git shorthand and pinned refs—not bare owner/repo
Pi’s git: prefix enables both host/user/repo shorthand and SSH shorthand. The following six forms for the same mattpocock/skills repository resolve to ~/.pi/agent/git/github.com/mattpocock/skills/, except for the deliberately invalid final example:
| What you enter | Result |
|---|---|
git:github.com/mattpocock/skills | HTTPS clone of the default branch |
git:github.com/mattpocock/skills@v1 | HTTPS clone pinned to the v1 tag |
git:[email protected]:mattpocock/skills | SSH clone using the key configured in ~/.ssh/config |
https://github.com/mattpocock/skills | HTTPS clone; no git: prefix required |
ssh://[email protected]/mattpocock/skills | SSH clone; no git: prefix required |
mattpocock/skills | Rejected—bare shorthand without a prefix is invalid |
The upstream Git package documentation defines these rules:
- Without the
git:prefix, only full protocol URLs are accepted:https://,http://,ssh://, orgit://. - With the
git:prefix, you may use shorthand such ashost/user/repooruser@host:path. - References remain pinned.
@v1continues to meanv1;pi update --extensionsdoes not move@v1tov2, but only updates the checkout for the configured ref. To change refs, install the replacement explicitly withpi install git:host/user/repo@new-ref. - SSH URLs automatically use your SSH agent or the key configured in
~/.ssh/config. In CI, setGIT_TERMINAL_PROMPT=0andGIT_SSH_COMMAND="ssh -o BatchMode=yes"to fail quickly instead of waiting for interactive input.
Other Git hosts are fully supported. Replace the host with, for example, git:gitlab.com/user/repo, git:codeberg.org/user/repo, or git:git.your-domain.tw/user/repo. This is the opposite of giving GitHub special treatment: Git shorthand does not assume GitHub and accepts any host.
npm and uv git+ syntax families, but it is not identical. Bare shorthand in gh repo clone owner/repo is an assumption implemented by the gh CLI. Pi deliberately rejects that form to avoid ambiguity over whether foo/bar refers to npm or GitHub.How sources differ—and where they fail
Installing a Skill may appear to be no more than entering a specification and selecting Install, but authentication and update behavior differ considerably by source. Use this table to choose the right route.
| Source type | Will it work? | Why | Solution |
|---|---|---|---|
Public GitHub repository over HTTPS (https://… or git:github.com/…) |
Yes, immediately | A public repository requires no authentication for git clone https://… |
Use it directly; this covers 90% of cases |
Public npm package (npm:@scope/pkg) |
Yes, through npm install |
The author has packaged and published the Skill to the npm registry | Use @version to pin a version; the ecosystem is still young, and most Skills are distributed through Git |
| Private GitHub repository over HTTPS | No, not through the UI alone | The UI has no field for a personal access token, and a non-interactive Git clone cannot prompt for a password | Choose one: (1) create a public fork; (2) use SSH as described below; or (3) connect to the add-on terminal and configure git config --global credential.helper store to cache credentials |
Private GitHub repository over SSH (git:[email protected]:owner/repo) |
Yes; Pi officially supports it | openssh-client is installed and reads ~/.ssh/config; docs/packages.md states that “SSH URLs use your configured SSH keys automatically.” |
Generate a key on the Home Assistant host, add its public key under GitHub Settings → SSH Keys, store the key in /data/pi-agent/home/.ssh/ because HOME is pinned to the volume, and first run ssh -T [email protected] to add the host key to known_hosts |
| Another Git host (GitLab, Bitbucket, Codeberg, or self-hosted) | Yes, with git:host/user/repo or a full https://… URL |
Pi’s Git shorthand does not assume a host | Enter it just as you would a GitHub source |
| Local path | Yes; Pi records the path in settings and reads it in place | Pi does not move the files—settings.json records the absolute path, which Pi scans at startup. | Use scp or Samba to place the files under /data/pi-agent/, then enter the path. Chapter 16 explains the process. |
/data/pi-agent/home/.ssh/ because HOME is pinned to the volume, rather than under /root/.ssh/. See docs/ARCHITECTURE.md. Initial setup can take 30 minutes, although it is reusable afterward. Unless you already manage Git through SSH, creating a public fork is generally the simpler option for home use and takes about five minutes.Three things to do after installation
A new row in the Skills panel does not mean the job is finished. Complete these three steps before relying on a Skill:
-
Start a new session and test the Skill
Seeing the Skill in the System Prompt panel in step 7 proves only that Pi Web recognizes it, not that the AI will use it correctly. Start a new session and name the Skill explicitly in a test request, such as “Please use Skill name to help me do XX.” If the AI responds and uses the relevant tools, the Skill works. If it says that it cannot see the Skill or ignores it, use the troubleshooting section below.
-
Read the Skill’s SKILL.md to understand what it does
The most common post-installation mistake is not reading the instructions. SKILL.md is the primary instruction file, not README.md. It contains the frontmatter fields Pi reads, including
name,description, andallowed-tools, and should explain triggers, required tools, and environment variables. Five minutes of reading is more useful than half an hour of blind experimentation. Expand the Skill’s details in the UI, or use Installed Path to open/data/pi-agent/home/.pi/agent/git/<host>/<user>/<repo>/SKILL.mdfor a Git package, or…/npm/…for an npm package. -
Remove it if it is not useful instead of spending tokens on it
As long as a Skill appears in the
<available_skills>block, it consumes system-prompt tokens—a fixed cost for every conversation. If, after a week, you never use it or discover that it duplicates another Skill, remove it without hesitation. Keeping it only increases API cost, clutters the system prompt, and makes the AI more likely to choose the wrong Skill. The next section explains how to remove one.
Two ways to remove a Skill
There are two removal methods, each suited to a different situation:
Method A: Remove it from the Skills panel UI (using pi remove)
Open the Skills panel and find the Skill’s row. Select Remove, then confirm. The backend runs pi remove <spec>, removes the registration from settings.json, and deletes the corresponding folder under ~/.pi/agent/git/… or ~/.pi/agent/npm/…. The UI displays the “Package removed.” toast (i18n.packageRemoved). This is the correct method in 99% of cases because it does not leave stale settings or risk deleting the wrong path.
Method B: Connect to the Home Assistant host and run pi remove
If the UI is unavailable, the package is too damaged for Pi Web to list, or you need to remove several packages, open a terminal attached to the Pi Agent add-on and use the CLI rather than running rm -rf yourself:
# Open a terminal attached to the Pi Agent add-on.
# Confirm the deployment-specific container name before using a host-level exec command.

# list installed packages
pi list

# remove an npm package
pi remove npm:@foo/bar

# remove a Git package
pi remove git:github.com/user/reporm -rf does not remove its registration from settings.json. At its next start, Pi may try to reinstall the missing package or report an error. Always prefer pi remove. If manual cleanup is unavoidable, update ~/.pi/agent/settings.json as well.Reload the session or start a new one after removal. The Skill will no longer appear in the system prompt. Existing sessions are unaffected: their Skill content was embedded in the system prompt when each session began, so removing a Skill does not alter their existing context.
Common problems
-
Nothing happens after I enter a URL and confirm
There are four common causes. (1) You entered bare
owner/repo, which Pi rejects; usegit:github.com/owner/repo. (2) The URL contains a typo, often a missinghttps://or misspelled owner; open it in a new tab to verify it. (3) The repository is private or has been deleted; open the URL in a private browsing window to confirm that it is public. (4) You selected Install but did not wait for the backend; look for the “Installing…” status and wait for the green check mark. -
Installation fails with “fatal: 401” or “Authentication failed”
This is the characteristic error for a private repository over HTTPS. Pi Agent’s UI has no authentication field, so a repository that requires credentials cannot be cloned that way. One solution is to create a public fork: select Fork on GitHub, then change the fork’s visibility to Public in its settings, if the repository’s license and your permissions allow it. Install that public fork instead. This error is highlighted in the comparison table because it is one of the most common problems for new users.
-
The clone completed, but the Skill does not appear in the panel
First select Reload Session (
i18n.reloadSession). This is more precise than F5, because Skill discovery occurs when a session opens; refreshing the page does not trigger a rescan. If it still does not appear, press F12, inspect the Console for errors, and then inspect the Network tab’s/api/skills?cwd=…request. The Woow acceptance suite tests this endpoint, which should normally return 200; a 4xx or 5xx status indicates a backend problem. Pay special attention to 403: it means the currentcwdis neither a trusted project nor a defaultpi-cwd-YYYYMMDD/directory. See the “Allowed cwd roots” section of ARCHITECTURE.md. -
The Skill is installed, but the AI seems to ignore it
First confirm that the Skill appears in the System Prompt panel under
<available_skills>. If it does, the likely problem is trigger specificity: the Skill’sSKILL.mddescription may be too vague for the AI to recognize when it applies. As a temporary workaround, ask, “Please use Skill name to help me.” For a long-term solution, read its README for recommended trigger phrases, or use Chapter 16 to write a clearer description. -
The clone is stuck at 50%
This is usually a network issue. The Home Assistant host may have a slow connection to GitHub, or the repository may be large; a few Skill repositories include assets of tens of megabytes or more. Wait 3–5 minutes. If it still does not finish, cancel it, open a terminal in the Pi Agent add-on container as described above, and run
pi install git:github.com/xxx/yyy. The terminal shows each step more clearly than the UI progress bar, and the UI will recognize the result because both interfaces share the Skills path bridge. Do not use~/.pi/agent/git/for a directgit clone; that omits the settings.json registration, so the UI will not recognize the package. -
The installed Skill has the same name as an existing one
Pi uses the SKILL.md
namefield as the key, not the folder name. The “Frontmatter” section ofdocs/skills.mdsays, “Pi does not require this to match the parent directory.” If two Skills have the same name, Pi deduplicates them: only one remains within a scope, and project scope takes precedence over global scope. Do not rename the folder manually; that does not solve the collision. In~/.pi/agent/settings.json, remove one package from thepackagesarray, or disable the conflicting Skill in the UI. -
I want to update an installed Skill
The UI includes update controls: select Check Updates (
i18n.checkUpdates) on the Skill’s row. Pi calls/api/skills/checkto compare the local and upstream versionHash. If an update exists, an Update button appears and calls/api/skills/update. From the add-on CLI, usepi update --extensionsto check all Git and npm packages, orpi update npm:@foo/barfor one package. A package pinned to a ref (@v1) does not move to a new ref automatically; it only refreshes that checkout. To change refs, runpi install git:host/user/repo@new-ref. -
The Skill directory is using a great deal of disk space
A typical Skill occupies a few hundred kilobytes to a few megabytes. If
du -sh /data/pi-agent/git/github.com/<user>/<repo>reports hundreds of megabytes or even gigabytes, the repository probably includes large assets such as sample videos or pretrained models. Check the README. If you do not need it, remove it. If you need the Skill but not the extra files, copy SKILL.md and the minimum required files to/data/pi-agent/skills/<name>/, the location for hand-authored Skills; remove the original Git package; then reinstall from the local path (/data/pi-agent/skills/<name>). See Chapter 16.
FAQ
How can I find useful Skills? Is there a catalog?
skills.sh, a community-curated directory organized by topic; (2) GitHub searches for topic:claude-skill or topic:pi-agent-skill; and (3) the r/ClaudeAI and r/homeassistant communities on Reddit, or the #skills topic on X. Prioritize Skills related to Home Assistant, smart homes, and household use cases. General coding or Markdown-formatting Skills offer less value in a home environment.Will installing a Skill improve conversation quality?
Do Skills update automatically when their authors make changes?
pi update --extensions. Even an update does not move a pinned ref such as @v1 to a new tag. It only refreshes the configured ref. To upgrade, explicitly run pi install git:host/user/repo@new-ref. This behavior is intentional: an author’s breaking change should not silently break your automation overnight.How many Skills can I install? Is there a limit?
Can different Skills conflict or compete with one another?
SKILL.md description and check whether two Skills cover the same triggers. If they do, keep only one. This is another reason to begin with one or two Skills and add more gradually.Where are installed Skill files? Can I edit them manually?
/data/pi-agent/home/.pi/agent/npm/<pkg>/; Git packages are under /data/pi-agent/home/.pi/agent/git/<host>/<user>/<repo>/; and hand-authored Skills are under /data/pi-agent/skills/<name>/. The Skills path bridge symlinks the last location to $HOME/.pi/agent/skills/, so both paths refer to the same files. The UI’s Installed Path field (i18n.installedPath) shows the exact path. Use the Advanced SSH add-on on the Home Assistant host and run cd to open it. Manual editing is allowed, but pi update resets local changes to a Git package. For lasting changes, fork the repository and install your fork.Is the additional API cost of Skills worthwhile?
Can I copy my Skills to another Pi Agent?
skills/. Archive the entire /data/pi-agent/ directory on host A—including skills/, home/.pi/agent/npm/, home/.pi/agent/git/, and home/.pi/agent/settings.json—then extract it to the same path on host B and reload the session. settings.json is essential: it records which npm and Git packages are installed, their pinned refs, and their scopes. Without it, those packages are not registered. A Home Assistant snapshot is simpler for backups; Chapter 20 explains that /data/pi-agent/ is included in full.